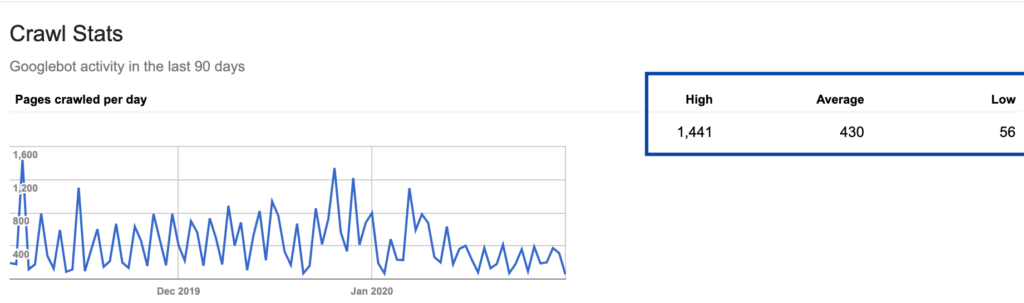
Google defines crawl budget as the set of URLs Google can and wants to crawl on a site. It’s not just a daily count in Search Console, and it’s not a balance you can save for later.
Two forces decide how much crawling happens: crawl capacity limit and crawl demand.
Crawl capacity limit: how much Google can crawl without putting too much strain on your server. If response times stay stable and errors stay low, Google may crawl more. If the site slows down, returns many 5xx errors, or sends rate-limiting signals such as 429, Google may crawl less.
Crawl demand: how much Google wants to crawl based on factors such as site size, update frequency, page quality, relevance, popularity, and whether content may be stale.
For Google’s crawling systems, a site is a unique hostname. That means www.example.com and shop.example.com can have separate crawl patterns.
Crawling also isn’t indexing. A page can be crawled and still not be indexed after Google evaluates, consolidates, and assesses it. A crawl budget fix can improve discovery and recrawling, but it doesn’t guarantee rankings or indexation.
When crawl budget is worth your attention
If your site has a few hundred pages, crawl budget probably isn’t where your SEO time should go. Google’s Crawl Stats report says sites with fewer than a thousand pages usually don’t need this level of crawling detail.
Google’s crawl budget guide is aimed mainly at:
Large sites around 1 million or more unique pages with content that changes about weekly.
Medium or larger sites around 10,000 or more unique pages with content that changes daily.
Sites where a large portion of URLs in Search Console are marked Discovered – currently not indexed.
Those figures are rough, not hard cutoffs. A smaller site can still have crawl problems if it creates endless faceted URLs, blocks key resources, ships lots of duplicate pages, or has serious server errors. But for most small business sites, the better first move is to improve page quality, fix indexability, strengthen internal links, and keep the sitemap accurate.
How to check crawl activity in Google Search Console
Google Search Console doesn’t show an exact crawl budget. It shows crawl activity, server responses, file types, crawl purpose, and host availability, which you can use to diagnose crawl efficiency.
Open Google Search Console and choose the correct property.
Use a Domain property or root-level URL-prefix property if possible, because the Crawl Stats report is available only for root-level properties.
Go to Settings.
Click Crawl stats.
Review total crawl requests, total download size, average response time, host status, crawl responses, file type, crawl purpose, and Googlebot type.
If you manage a large site, compare Search Console data with server logs. Search Console reports most crawl requests, but Google says some requests may not be counted, so log files can give a more detailed view by URL or directory.
How to estimate crawl activity without treating it as a fixed budget
The old way to talk about crawl budget was to multiply average pages crawled per day by 30 and call it a monthly budget. That can be a rough activity estimate, but it isn’t the same as Google’s crawl budget.
For example, if Search Console shows an average of 430 crawl requests per day, 430 × 30 gives you about 12,900 crawl requests in a 30-day month. That number can help with capacity planning, but it isn’t a promise that Google will crawl the same number of pages next month.
Also note the word requests. Crawl Stats counts requested URLs and resources, not just indexable HTML pages. Redirect chains, CSS, JavaScript, images hosted on your domain, robots.txt checks, and repeated requests for the same URL can all affect the totals. Use the number as a trend, then look at what Google is spending those requests on.
How to improve crawl efficiency
The goal isn’t to trick search engines into crawling more. The goal is to make your valuable pages easier to find, faster to fetch, and less buried under URLs you don’t want crawled.
1. Manage your URL inventory
Start by deciding which URLs deserve search visibility. Product pages, category pages, service pages, guides, and articles may belong in the index. Internal search results, filtered duplicates, cart URLs, tracking-parameter variants, and thin tag archives often don’t.
2. Keep sitemaps accurate
Your XML sitemap should list the canonical URLs you want indexed, not every URL your site can generate. For pages that change, keep <lastmod> accurate and reserve it for meaningful updates such as changes to main content, structured data, or links. Don’t refresh sitemap dates just because the copyright year changed.
If you’re using WordPress, an SEO plugin often handles basic sitemaps for you. Still, check the sitemap after large content changes, migrations, new custom post types, ecommerce changes, or template updates.
3. Fix duplicate and near-duplicate content
Duplicate content isn’t automatically a Google spam violation, but duplicate URLs can waste crawling resources and make reporting harder. Common patterns include HTTP and HTTPS versions, trailing slash variants, parameter URLs, sorted category pages, and print-friendly versions.
Use one preferred canonical URL for each piece of content. Then align your internal links, sitemap URLs, redirects, and canonical tags around that version. If you need a deeper refresher, read our guide to handling duplicate content.
4. Make internal links easy to crawl
Every page you care about should have at least one crawlable link from another page on your site. Google can generally crawl standard <a href='...'> links, so don’t hide important navigation behind scripts, filters, or buttons that don’t render as crawlable links.
Internal links also tell users and search engines which pages belong together. Link from high-value pages to related categories, guides, and service pages where it makes sense for the reader.
5. Reduce redirect chains and loops
A redirect from an old URL to the best replacement is normal. A chain of old URL → newer URL → newer URL → final URL wastes requests and slows discovery.
Update internal links so they point directly to final URLs. After migrations, crawl the site and fix chains, loops, mixed HTTP/HTTPS paths, and outdated internal links left behind in menus, footers, old blog posts, and XML sitemaps.
6. Improve server response and page loading
Fast, stable servers let crawlers fetch more with the same amount of connection time. Slow responses, timeouts, and frequent server errors tell Google to back off so it doesn’t overload your site.
Focus on server response time, caching, image weight, render-blocking resources, and plugin bloat. On WordPress sites, review themes and plugins regularly, compress images, cache pages where appropriate, and remove assets that don’t support the page. Faster pages also tend to improve user experience, so this work pays off beyond crawling.
7. Return the right status codes
Status codes tell crawlers what happened. If a page still exists, it should usually return 200. If it moved permanently, use 301 or 308. If it’s gone with no replacement, use 404 or 410. If the content hasn’t changed and your server can support it, a 304 response can save bandwidth and processing time.
Pay special attention to soft 404s. These are pages that look like error pages but return 200. They create a poor experience for users and can keep Google requesting pages that shouldn’t be treated as live content.
8. Use robots.txt and noindex for the right jobs
Robots.txt and noindex don’t do the same job. Use robots.txt when you don’t want Google to crawl a page or resource at all. Use noindex when Google can crawl the page but you don’t want it in search results.
Don’t use noindex as your main crawl budget control, because Google has to crawl the page to see the noindex directive. Over time, removed or noindexed URLs may let crawlers focus on other URLs, but robots.txt is the stronger tool when crawling itself is the problem.
Also, don’t rely on the non-standard crawl-delay rule for Google. Google’s crawlers don’t process it.
9. Simplify site architecture
A simple structure makes the pages that matter easier to reach. Key categories, service pages, product sections, and evergreen guides shouldn’t sit five or six clicks deep with no contextual links pointing to them.
Use navigation, breadcrumbs, category hubs, and related content links to connect important sections. The example below shows a pattern where users and crawlers can reach categories and subcategories from the main navigation.
For larger sites, architecture is often where the biggest crawl efficiency gains happen. If a crawler can move from the homepage to the most valuable sections quickly, less of its time is wasted on dead ends.
A practical crawl budget checklist
Check the Crawl Stats report for server errors, slow response times, redirect errors, and file-type spikes.
Compare Search Console with server logs if you need URL-level crawl data.
Keep XML sitemaps limited to canonical, index-worthy URLs.
Use accurate <lastmod> values only for meaningful page updates.
Consolidate duplicate pages with redirects or canonical tags.
Block long-term crawl traps with robots.txt where crawling isn’t needed.
Fix soft 404s, redirect chains, and redirect loops.
Make sure important pages have crawlable internal links.
Improve server speed and stability before expecting more crawling.
Review faceted navigation, tag archives, internal search pages, and parameter URLs.
Get new small business insights by email
Practical ideas and useful articles to help you make better business decisions.
Gabriel Nwatarali is the founder of Tech Help Canada and has worked in SEO, copywriting, and web strategy since the early 2000s. His work has helped drive more than 10 million app downloads and 2,900% organic traffic growth for startups, agencies, and brands across North America. He writes about SEO, marketing, AI, and the decisions that shape how businesses grow online, drawing on hands-on experience building websites, content systems, and digital strategies.